
Perhaps you’re familiar with “death by PowerPoint,” a catchphrase that characterizes the feeling some audiences experience when they consume disjointed, rambling, visually unappealing presentations supported by text-heavy slide decks.
As instructional designers, trainers, educators, technical writers, and presenters of instructor-led training (ILT), “death by PowerPoint” is the opposite of our goal.
Here’s how to avoid it.
The causes of “death by PowerPoint”
Nobody sets out to develop or deliver a mind-numbingly boring presentation. It happens as a by-product of:
- Not giving ourselves enough time to prepare a high-quality presentation. When we’re pressed for time, we can be so eager to fill up slides that we we fill them with the first thing that comes into our mind. And because most of us find editing difficult, once that content appears on slides we tend to avoid replacing or rearranging it, making only minor tweaks (if we make any changes at all). The result is that we end up delivering not a polished presentation, but an unfinished draft of what could have been—with a little more time and effort—a solid, high-quality presentation.
- Believing that slide decks aren’t really that important because good presenters can “wing” any instructional presentation. The reality is that very few presenters well-versed in a given topic can leverage a poorly designed visual deck to deliver a successful presentation. Expecting them to do so is like expecting voiceover talent to dream up narration for a video extemporaneously as they watch a video, or expecting theater actors to make up their lines as a play unspools on stage. A slide deck—or, more accurately, an instructor guide—is to a live presentation what a storyboard is to a video and a script is to a play: the purpose of all three is to identify what audiences should see, hear, and experience to ensure a result that’s as high quality as possible, and that’s as consistent as possible over multiple deliveries.
How to create an instructor guide that prevents “death by PowerPoint”
Applying the following strategies turns an ordinary slide deck into an instructor guide that:
- Makes delivering a presentation easier for presenters
- Makes handing off a presentation for delivery by another presenter possible
- Drives audience appeal, understanding, and recall
>>>>>STEP 1: Create a storyboard.
Outside of the presentation software (on a blank sheet of paper, perhaps), begin by creating a three-column table that includes:
- An ordered list of the concepts you want the to presentation cover;
- Ideas for onscreen visuals to support the concepts, and
- Key points the instructor should make (and key questions the instructor should ask learners) during the presentation to drive comprehension and informally assess mastery. Include suggestions for hands-on activities, extra examples, caveats, links to supporting materials, informal “pulse check” or quiz questions—anything that would be useful to an instructor trying to explain and help audiences grasp on-slide concepts.
>>>>>STEP 2. Create a series of slides (in software such as PowerPoint).
- On the first slide of the slide deck (soon to be an instructor guide), include the presentation title, date, and the name of the individual who’ll be giving the presentation. Presenting unique identifying information on the intro slide sets learner expectations and also allows learners to follow up post-presentation, if necessary.
- On the second slide, present an agenda consisting of the numbered concepts that appear in column #1 of your three-column table.
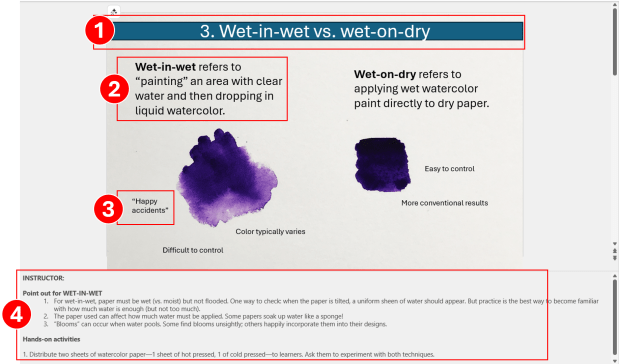
- On the third slide, begin at the top of the leftmost column of your three-column table and: a) Place the # and concept in a banner at the top of the slide. Doing so orients audiences and prepares them mentally to absorb slide content, which helps drive understanding and recall. b) Place an image on the slide. Of the possibilities you listed in the second column of your three-column table choose the most meaningful, compelling image(s) to illustrate the concept. (You may need to try a few and see how they look. Often, it takes generating five or ten off-the-top-of-the-head ideas to produce one or two good ideas, which is why it’s important to list several options in our three-column table.) Include text labels and callouts to your on-slide image as necessary, but add them sparingly. c) Place all key points/questions related to the concept in the instructor notes section. Figure 1 below shows an example slide in an instructor guide for an Introduction to Watercolor presentation.
- Repeat #3 above for each of the concepts that appears your three-column table to create the remaining slides in your instructor guide.
- Finish your deck by adding an “outro” slide that includes “Thank you” or a similar phrase. Doing so formally signals audiences that the presentation is over and encourages one last opportunity for audience questions.
>>>>>STEP 3. Apply slide timings.
Adding presenter-controlled slide timings such as “fade in” and “fade out” allow presenters to synchronize what audiences hear with what they see, which drives understanding and prevents overwhelm. The alternative is to show all content at once in a “wall of words” that discourages audiences from paying attention to the presenter, while simultaneously making reading difficult. (It’s tough to read, make sense of information, and retain while someone is speaking about something else!)
Tip: to create a slide timing in PowerPoint, click an onscreen image; then, from the ribbon that appears by default across the top of the screen in PowerPoint, click Animations.
>>>>>STEP 4. Consider creating and distributing a text document based on the instructor guide.
Providing a copy of the instructor guide itself to audiences is of limited value.
Instead, consider taking the time to create and deliver a thoughtfully organized text document (based on your storyboard) that incorporates all the concepts, visuals, and important points of the presentation into a cohesive whole, accompanied by a table of contents. Doing so allows you to distribute the text document document:
- As pre-learning
- As post-training reference documentation
- As an effective alternative to a recorded presentation for post-delivery distribution. In corporate settings, it’s standard practice to record presentations to be viewed later by audience members who can’t attend the live presentation. But sitting through a recorded presentation is notoriously unappealing and, more important, rarely a good use of an audience’s time. All other things being equal, information in text format (vs. slide format) is much quicker, easier, and more efficient for audiences to consume than either a slide deck or a recorded live presentation.
The bottom line
It takes a bit more effort to create an instructor guide than it does to create a garden-variety slide deck. But that effort translates into a more enjoyable, more coherent, more effective experience for our audience and also enables consistency across instructors and cohorts.
And just think: if all of us replaced last-minute slide decks with thoughtful instructor guides, in time we might be able to make “death by PowerPoint” as obsolete a phrase as “Valley speak” or “23 skiddoo.”
And wouldn’t that be wonderful?
What’s YOUR take?
How much planning does your team put into creating presentation decks? Do you incorporate in-class knowledge checks or practice activities—and if so, how useful are they? Please consider leaving a comment and sharing your hard-won experience with the learning community.
One response to “Why (and how) to replace ILT slide decks with instructor guides”
-
Excellent points!
LikeLike

Leave a comment